
Laravel Filesystem provides different drivers to work with local filesystem, Amazon S3, Rackspace, etc. These drivers provide a convenient and easy way to upload files locally or on the cloud.
Amazon S3 is a popular service for storing images, files, and documents. Secondly, keeping your files on the cloud will save a lot of bandwidth for your website. It saves your hosting space plus cloud performance is scalable.
Here at Fixwebnode, as part of our Website Development Services, we regularly help our Customers to maintain their Laravel Websites.
In this context, we shall look into how to upload file to s3 using laravel filesystem.
Steps to Upload file to S3 using Laravel Filesystem
As previously highlighted, Amazon S3 ( Simple Storage Service) is a cloud storage facility that allows for the upload, storage and retrieval of data, including static websites, images and documents.
Laravel provides drivers to easily connect and upload your data to Amazon S3. Now, let's take a look at the procedure to perform this task.
1. Create S3 Bucket
To begin, you need to create a bucket and a user by following the below process:
Go to Amazon Web Service Console and Log into the account.
Click on S3 from Service Lists
Click on "Create Bucket" button and you will see a form where you can enter your bucket name.
Now, Create an IAM User by Clicking on create IAM User.
Next, Click on "Create User" button to create a user.
Next Add User Name and select "Programmatic access" from access type options followed by clicking on Next (Permissions).
Next Select "Attach Existing Policy Directly" and choose "AmazonS3FullAccess" from permission link.
Now, you will see the Add tags section which is optional, so you can skip and click on Next to move to the Review page.
In the Review page, you can view the entered user details and then click on "Create User" button to proceed.
Now you will see created user and a Success message in the top section. The created user will have an "Access Key ID" and "Secret Access Key" which we will need on the .env files.
2. Install Laravel 8
Here, we will install a fresh laravel 8 version application by running the below command via the terminal:$ composer create-project --prefer-dist laravel/laravel blog
3. Install Amazon S3 Composer Package
You can install amazon s3 package along with s3 composer by running the below command:$ composer require --with-all-dependencies league/flysystem-aws-s3-v3 "^1.0"
4. Configure AWS S3 Credentials
Here, we will add the aws credentials to your .env file according to your information:$ sudo vi .envAWS_ACCESS_KEY_ID=APGHVAEWWDTDY...AWS_SECRET_ACCESS_KEY=Zp/wgwj46SAC....AWS_DEFAULT_REGION=us-east-2AWS_BUCKET=fixwebnode-bucketAWS_USE_PATH_STYLE_ENDPOINT=false
5. Create Routes
Here, we will add two new routes to the web.php file. One route will help to generate form while the other one will server as the post method. So do so by editing the web.php file as shown below:routes/web.php<?phpuse Illuminate\Support\Facades\Route;use App\Http\Controllers\ImageUploadController;Route::get('image-upload', [ ImageUploadController::class, 'imageUpload' ])->name('image.upload');Route::post('image-upload', [ ImageUploadController::class, 'imageUploadPost' ])->name('image.upload.post');
6. Create ImageUploadController
From the new ImageUploadController created from executing the command in step 3, we need to write two methods imageUpload() and imageUploadPost(). imageUpload() will handle the get methods while imageUploadPost() method will take care of the post. See how we implemented it below:app/Http/Controllers/ImageUploadController.php<?phpnamespace App\Http\Controllers;use Illuminate\Http\Request;class ImageUploadController extends Controller{/*** Display a listing of the resource.** @return \Illuminate\Http\Response*/public function imageUpload(){return view('imageUpload');}/*** Display a listing of the resource.** @return \Illuminate\Http\Response*/public function imageUploadPost(Request $request){$request->validate(['image' => 'required|image|mimes:jpeg,png,jpg,gif,svg|max:2048',]);$imageName = time().'.'.$request->image->extension(); $path = Storage::disk('s3')->put('images', $request->image);$path = Storage::disk('s3')->url($path);/* Store $imageName name in DATABASE from HERE */return back()->with('success','You have successfully upload image.')->with('image', $path); }}
7. Create Blade File
Now, we need to create imageUpload.blade.php file and in this file we will create a form with file input button. So use the below information:
resources/views/imageUpload.blade.php
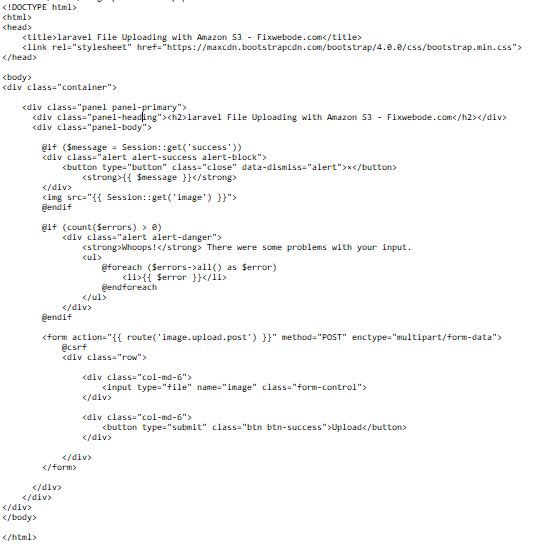
After editing the file, save and close it.
Now, run it to check if it is working by running the below command:$ php artisan serve
Then open the url below:http://localhost:8000/image-upload
This will display on your browser the Amazon s3 upload page which your created. So once you update a file, it will be updated to your Amazon s3 account as an Object.
[Need help in fixing PHP Laravel website issues? We can help you. ]
This article covers How to Upload Files to Amazon S3 Using Laravel and how you can demonstrate the scalability of Amazon S3 with the Laravel framework. In fact, AWS provides a dedicated service to upload files to Amazon S3 easily and efficiently.