Multiple File Upload With Progress Bar in Laravel - How to configure your Laravel 8 Application ?
LaravelSometime, you might need to display progress bar while uploading multiple image file in laravel.
Here at Fixwebnode, as part of our Website Development Services, we regularly help our Customers to perform related Laravel customization queries.
In this context, we shall look into how to upload multiple file with progress bar using ajax in laravel.
Table of contents [Show]
1. Download new Laravel App
To begin, open your terminal and run the following command to go to the "htdocs" directory and install or download laravel application for laravel multiple file upload with progress bar app:$ cd xampp\htdocs
Next, run the below command to download a new laravel application:$ composer create-project --prefer-dist laravel/laravel Blog
2. Add Database Details
Here, go to downloaded laravel multiple file upload progress bar using ajax root directory and open .env file. Then add your database details in .env file, as shown below:DB_CONNECTION=mysql DB_HOST=localhost DB_PORT=3306 DB_DATABASE= database name here DB_USERNAME= database username here DB_PASSWORD= database password here
3. Create Migration and Model
Here, open a command prompt and run the following command:$ php artisan make:model Sample -m
This command will create one model name Sample.php and as well as one migration file for the Sample table.
Next, Navigate to database/migrations folder and open create_samples_table.php.
Then update the following code into create_samples_table.php:use Illuminate\Support\Facades\Schema;use Illuminate\Database\Schema\Blueprint;use Illuminate\Database\Migrations\Migration;class CreateSamplesTable extends Migration{/*** Run the migrations.** @return void*/public function up(){Schema::create('samples', function (Blueprint $table) {$table->increments('id');$table->string('title');$table->timestamps();});}/*** Reverse the migrations.** @return void*/public function down(){Schema::dropIfExists('samples');}}
Next, run the following command to migrate the table into your select database:$ php artisan migrate
4. Add Multiple File Upload Route
Here, Navigate to the /routes folder and open web.php file. Then update the following routes into your web.php file:Route::get('multiple-file-upload-progress-bar', 'MultipleFileUploadController@index');Route::post('multiple-file-upload', 'MultipleFileUploadController@uploadMultipleFile');
5. Create Multiple File Upload Controller by Artisan
Here, open your terminal and run the following command to create ajax file upload controller file:$ php artisan make:controller MultipleFileUploadController
This command will create a controller named MultipleFileUploadController.php file.
Next, Navigate to app/http/controllers/ folder and open MultipleFileUploadController.php. Then add the following file uploading methods into your MultipleFileUploadController.php file:namespace App\Http\Controllers;use Illuminate\Http\Request;use App\Sample;class MultipleFileUploadController extends Controller{public function index(){return view('multiple-file-upload-progress-bar');}public function uploadMultipleFile(Request $request){foreach($request->file('file') as $image){$new_name = rand() . '.' . $image->getClientOriginalExtension();$image->move(public_path('images'), $new_name);Sample::insert(['title' => $new_name]);}$res = array('success' => 'Multiple Image File Has Been uploaded Successfully');return response()->json($res);}}
6. Create Multiple File Upload with Progress Bar Blade View
Here, create one blade view file named multiple-file-upload-progress-bar.blade.php.
Now, navigate /resources/views and create one file name multiple-file-upload-progress-bar.blade.php.
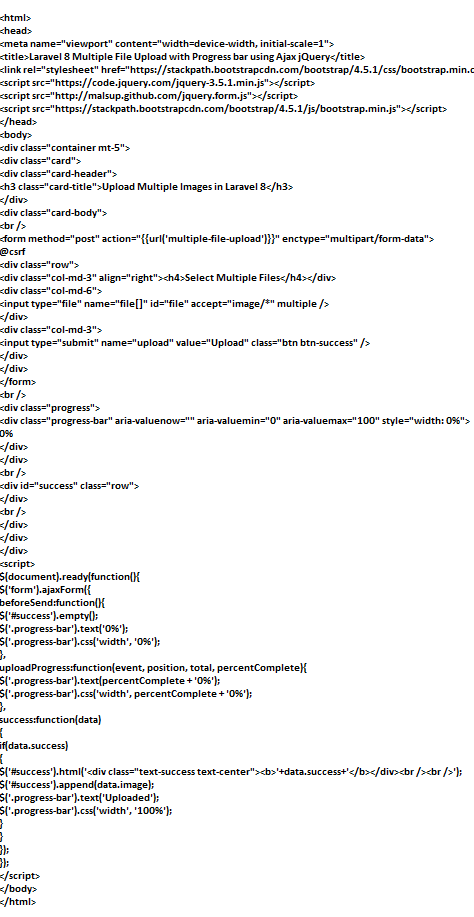
Then update the following code into your multiple-file-upload-progress-bar.blade.php file:
7. Test Application
Now, run the following command to start the development server for your laravel multiple file upload with progress bar using ajax app:$ php artisan serve
If you want to run the project diffrent port so use this below command:$ php artisan serve --port=8080
Next, open your browser and hit the following URLs into it:http://localhost:8000/multiple-file-upload-progress-bar
OR hit in browserhttp://localhost/blog/public/multiple-file-upload-progress-bar
[Need support in fixing Laravel Application issues ? We can help you. ]
This article covers how to upload multiple image file with progress using ajax in laravel 8. In fact, file uploading is a very userful feature as it helps users to upload their images or file on web server from their local computer.


